


Introduction
Let’s say a customer reaches out to your business:
- through live chat
- while another is waiting on email,
- And at the same time, a high-priority case comes in through phone support.
Which one should your team handle first? And how do you make sure no agent is overloaded while another is sitting idle?
That’s where Salesforce Omni-Channel Routing comes in. Instead of leaving it to chance or a messy manual assignment, this feature intelligently distributes work to the right agent at the right time.
Learn how Salesforce integrations enhance customer routing and overall CRM efficiency in our Top Salesforce Integrations tool for B2B Businesses
This aligns closely with why many businesses are migrating to Salesforce B2B eCommerce Lightning.
But here’s the twist: Omni-channel routing in Salesforce isn’t just about assigning tasks randomly. It considers a lot of factors to ensure the customer gets the best possible experience every single time. Now, you might be wondering what it is exactly, how to get started, how to set it up, and how to get the most out of it.
In this blog, we’ll break down how Salesforce omnichannel routing works step by step, and illustrate it with practical examples you can relate to. By the end, you’ll see why mastering this feature could be the difference between average support and a customer experience that actually delights.
For those new to Salesforce setup, check out our Salesforce Implementation Guide 2025 Edition to configure your org efficiently before enabling Omni-Channel.
What is Salesforce Omni-Channel?

Salesforce Omni-Channel is a powerful customer service and sales feature that automatically routes work items, like cases, leads, chats, or tasks, to the right agent at the right time. Instead of agents having to pick work from a queue, omni-channel routing in Salesforce ensures that requests are intelligently distributed based on rules you set, such as:
- Agent availability – only agents who are online and free get new work.
- Skill sets – cases are matched to agents with the right expertise.
- Workload capacity – prevents agents from being overloaded while others are underutilized.
- Priority levels – urgent or high-value cases can jump the queue.
The result? Faster response times, more balanced workloads for your team, and most importantly, happier customers who feel heard across every touchpoint (chat, phone, email, or social).
How to Get Started with Salesforce Omni-Channel and Its Routing?

Getting started with Salesforce Omni-Channel may feel a bit overwhelming at first, but once you set it up, it becomes the backbone of smooth customer experiences.
If you’re just setting up , follow our Salesforce Implementation Checklist to make your transition smoother.
If you are feeling stuck or maybe need professional assurance, then connect with Salesforce developers to help you get started and simplify things.
Here’s how to begin:
1. Enable Omni-Channel in Salesforce
- Go to Setup in Salesforce.
- Search for Omni-Channel Settings.
- Enable it with a single click.
This unlocks the full Salesforce omnichannel routing functionality in your org.
2. Define Your Service Channels
Decide what you’ll be routing:
- Cases
- Leads
- Chats (from Live Agent or Messaging)
- Tasks
Each channel represents a customer touchpoint that can flow through omni-channel routing in Salesforce.
3. Set Up Routing Configurations
This is where you tell Salesforce how to distribute work.
- Choose routing models like Least Active Agent or Most Available Agent.
- Assign priorities so urgent cases get picked up first.
- Define capacity models to prevent agent overload.
4. Create Presence Statuses for Agents
Agents need a way to signal if they’re available. For example:
- Available for Chat
- Available for Cases
- Offline
When an agent marks themselves available, Salesforce omni-channel routing starts sending them work automatically.
5. Assign Agents to Queues
- Build queues for each service channel (e.g., “Billing Issues,” “Technical Support”).
- Add agents with the right skills to each queue.
This ensures the right work goes to the right team.
6. Test with a Pilot Group
Before rolling it out company-wide, test it with a small team. Check if:
- Workloads feel balanced.
- High-priority cases are reaching the right agents.
- No one is being overloaded while others sit idle.
7. Monitor and Optimize
Use Omni-Channel Supervisor to track:
- Active agents
- Current capacity
- Pending cases
From here, tweak routing rules until everything flows smoothly.
How Omni-Channel Routing Works in Salesforce?
Once you’ve enabled and configured it, you can get started with Salesforce Omni-Channel routing. It constantly watches for new customer requests and sends them to the best available agent without delays or manual guesswork.
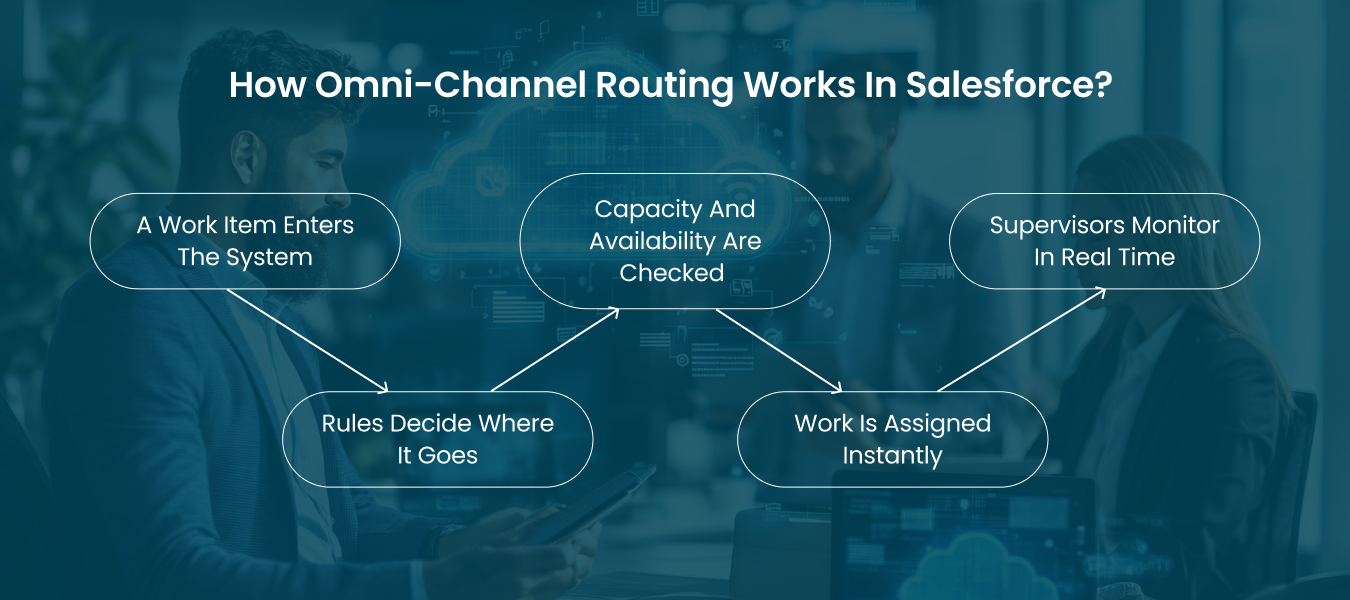
Here’s how the routing process flows in Salesforce:
1. A Work Item Enters the System
Whenever a customer raises a case, starts a live chat, submits a lead form, or creates a task, Salesforce automatically converts it into a work item. This becomes the unit that gets routed.
2. Rules Decide Where It Goes
Your pre-defined routing rules take over. For example:
- High-priority cases jump the queue.
- Sales leads go to agents in specific territories.
- Technical issues are sent to agents with specialized skills.
This is the backbone of omni-channel routing in Salesforce, ensuring the right type of work lands in the right queue.
3. Capacity and Availability Are Checked
Salesforce omnichannel routing doesn’t overload agents. It checks:
- Is the agent online?
- How many items are they already handling?
- Do they have the skill set for this case?
Only when conditions are met will the item be routed.
4. Work Is Assigned Instantly
Once matched, the work item is automatically delivered to the best-fit agent. They receive notifications in real-time, without needing to pull work from a queue.
5. Work Is Assigned Instantly
Managers can use the Omni-Channel Supervisor dashboard to see:
- Which agents are online
- How many cases are active
- Whether workloads are balanced
This makes it easy to adjust and maintain consistent service levels.
In short, omni-channel routing in Salesforce ensures every customer gets the right attention, from the right agent, at the right time, making support smoother for your team and far more satisfying for your customers.
Also Read: Salesforce Developer Hourly Rate in the US for 2026
Best Practices for Omni-Channel Routing in Salesforce!
Implementing Salesforce Omni-Channel routing is powerful, but getting the most out of it requires strategy. Here are the best practices to follow if you want to deliver smooth, consistent, and customer-first experiences:
1. Start with Clear Routing Rules
Define business priorities before configuring. For example:
- Route high-value leads first.
- Escalate urgent support cases immediately.
- Send technical queries to specialized agents.
The clearer your routing rules, the more effective omni-channel routing Salesforce becomes.
2. Start with Clear Routing Rules
Don’t overload your star performers. Use Salesforce omni-channel routing to assign work based on capacity (number of chats, cases, or leads an agent can handle). This keeps productivity high and prevents burnout.
3. Use Skill-Based Routing for Accuracy
Pair customers with the right expertise. Skill-based routing ensures a billing issue doesn’t land with a technical engineer and vice versa. This small tweak can significantly improve first-contact resolution.
4. Leverage Presence Statuses Wisely
Encourage agents to actively update their presence (e.g., “Available for Chat” or “Offline”). Correct statuses allow Salesforce omnichannel routing to work effectively and prevent misrouted cases.
5. Monitor with Omni-Channel Supervisor
Supervisors should actively monitor dashboards to spot bottlenecks, idle capacity, or overloaded agents. This helps managers make real-time adjustments and maintain service-level agreements.
6. Pilot Before Scaling
Roll out Salesforce omni-channel routing to a small group first. Gather feedback, monitor routing patterns, and fine-tune rules before expanding company-wide.
7. Continuously Optimize with Data
Use reports and analytics to answer questions like:
- Which queues get overloaded most often?
- Which routing rules lead to faster resolutions?
- Are agents closing cases faster with skill-based routing?
Optimization ensures your routing strategy evolves with customer needs.
8. Align Routing with Business Goals
Omni-channel isn’t just a support tool; it can drive sales too. Align routing rules to push VIP leads to your top sales reps or route high-value cases to senior support engineers.
For a deeper view of how Salesforce compares with other CRMs in performance and strategy, explore our Salesforce vs HubSpot for B2B Sales business
Final Thoughts
We’ve walked through what Salesforce Omni-Channel is, how it works, and the best practices to make routing more effective.
By now, it’s clear that Salesforce omni-channel routing goes beyond simple case assignments; it creates a smarter, balanced system that aligns with both customer expectations and business goals.
When configured well, omni-channel routing in Salesforce ensures that every interaction is handled efficiently, every agent is utilized effectively, and every customer leaves with a better experience. It’s not just a tool inside Salesforce; it’s a framework for building long-term trust and operational consistency.
The key is the right set-up and customizing as per your business workflow. If you are looking for professional assistance, you can hire dedicated developers who can help you out.
Frequently Asked Questions(FAQs)
Omni-Channel Flow Routing allows you to use Salesforce Flows to define advanced, custom routing logic. Instead of just assigning work based on standard rules, you can use flows to add complex decision-making. For example, routing high-value cases directly to senior agents or sending leads from certain regions to specialized teams. This makes omni-channel routing in Salesforce highly flexible and aligned with business goals.
To set up Salesforce Omni-Channel:
- Go to Setup and enable Omni-Channel.
- Define service channels (cases, leads, chats, tasks).
- Create routing configurations to decide how work gets assigned.
- Set up presence statuses (e.g., Available for Chat, Offline).
- Assign agents to the right queues.
Once configured, Salesforce omnichannel routing automatically directs work items to the most appropriate agents based on your rules.
Omni-channel in Salesforce works like a smart dispatcher. When a customer request comes in, whether it’s a case, lead, chat, or task, Salesforce’s omni-channel routing evaluates it against predefined rules.
It then checks agent availability, workload capacity, and skill sets to assign the request to the best agent. The result is a smoother workflow, faster response times, and a consistent customer experience across all touchpoints.
Common risks include poor resource alignment, communication gaps in offshore models, and scope mismanagement. A strong Staff Augmentation Business Plan helps mitigate these challenges.